
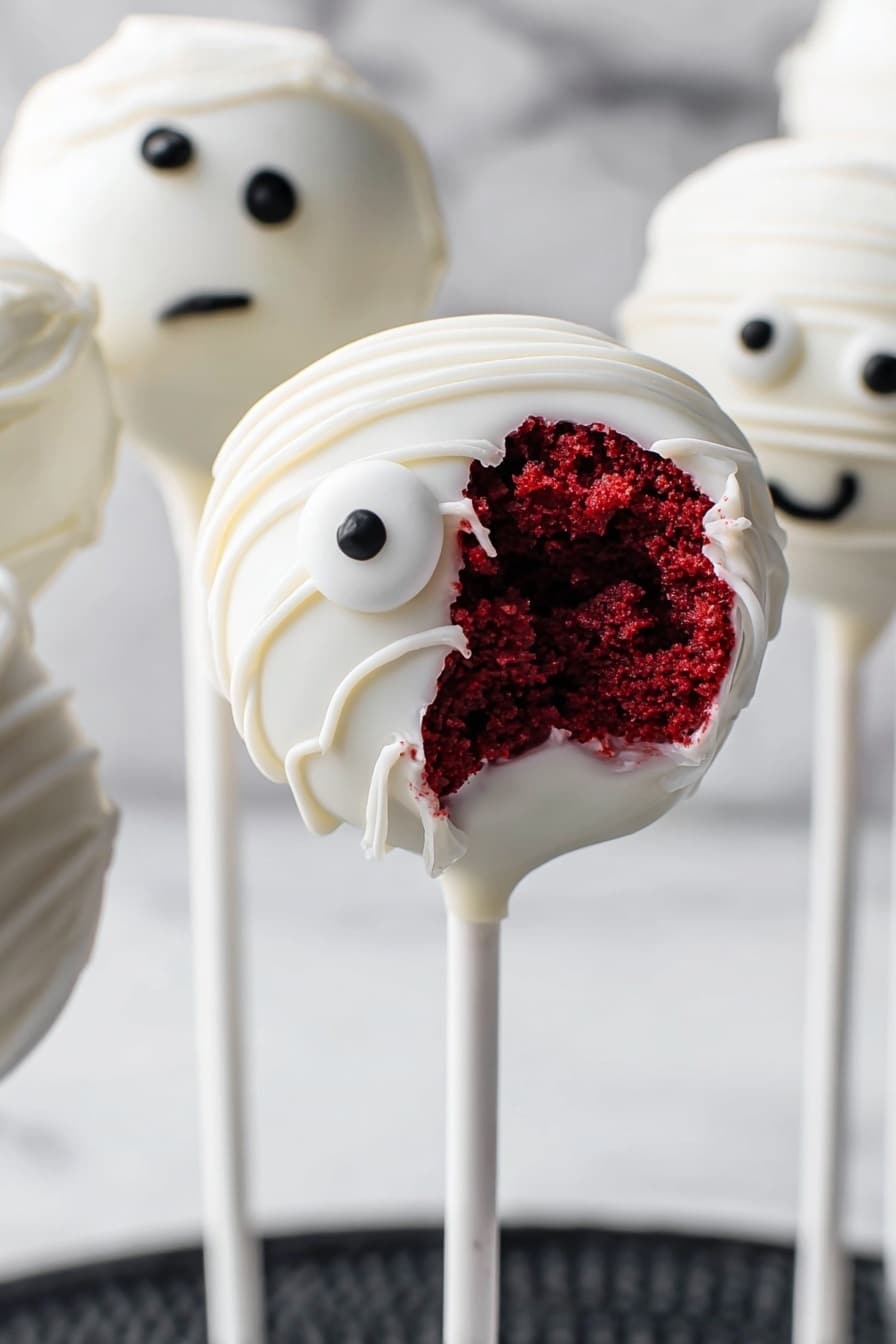
If you’re looking to add some spooky fun to your Halloween celebrations, this Halloween Cake Pops Recipe is an absolute must-try! These adorable little treats combine moist red velvet cake with creamy frosting and festive decorations that will delight kids and adults alike.
Why You Should Make This Recipe
Easy to make with simple ingredients: You don’t need complex baking skills to whip up these cake pops, making them perfect for any skill level.
Fun and festive presentation: From mummies to ghostly faces, these pops are eye-catching and perfect for Halloween parties.
Customizable decorations: Use candy eyeballs, colored wafers, or ribbons to tailor each pop to your spooky style.
Perfect bite-sized treats: These cake pops are the ideal portion for kids and adults to enjoy without guilt or mess.
Ingredients & Substitutions
This Halloween Cake Pops Recipe uses straightforward yet essential ingredients that each add a special touch — the red velvet cake mix brings richness and color, the cream cheese frosting adds moisture and tang, and the white chocolate wafers help create that smooth, festive coating that holds everything together beautifully.
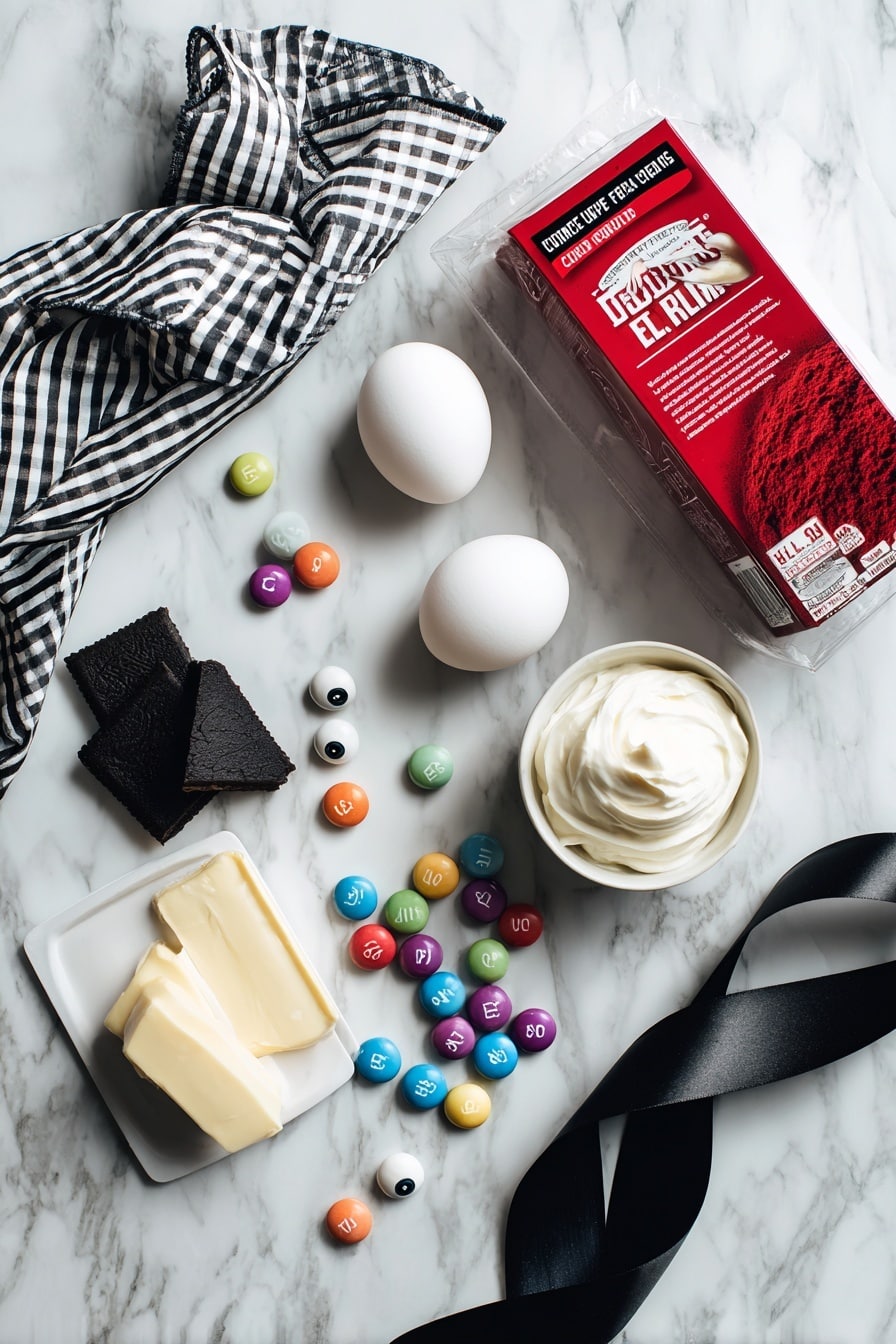
- Red Velvet Cake Mix: The base of our cake pops, providing vibrant color and a classic flavor that’s perfect for Halloween.
- Cream Cheese Frosting: Combines with cake crumbs to form a moist, moldable base that’s creamy and delicious.
- White Chocolate Candy Melting Wafers: These melt smoothly and create the perfect coating for decorating your cake pops.
- Black Gel Food Color: Adds vivid contrast and detail when decorating spooky faces and mummies.
- Candy Eyeballs: Brings your cake pops to life with fun, creepy eyes!
- Vegetable Shortening: Helps thin the coating for easier dipping and smooth finishes.
How to Make Halloween Cake Pops Recipe
Step 1: Bake the Red Velvet Cake
Start by preheating your oven to 350°F. In a large mixing bowl, combine the red velvet cake mix with eggs, oil, and water. Beat on medium speed for about two minutes until everything is fully blended. Pour the batter into a greased 9×13-inch baking dish and bake for 25 to 30 minutes, or until a toothpick inserted in the center comes out clean. Let the cake cool for 10 minutes before transferring it to a cooling rack to cool completely—this step is critical for perfect cake pops!
Step 2: Prepare the Cake Pop Base
Once your red velvet cake has cooled, break it up into pieces and pulse in a food processor until you get fine crumbs. Transfer these crumbs to a large bowl and mix in the cream cheese frosting until the mixture is moist and holds together when squeezed. Roll the mixture into 2-inch balls using your hands. For the ghost shapes, roll four balls slightly longer and fan out one end to give that spooky ghostly silhouette!
Step 3: Insert the Sticks and Chill
Melt about 15 white chocolate candy wafers in a microwave-safe bowl, stirring every 30 seconds until smooth. Dip one end of each cake pop stick about 1 inch into the melted chocolate, then insert into each cake ball about two-thirds of the way in. Clean off excess chocolate with your finger to keep things neat. Place all the cake pops in the fridge for about 15 minutes to let the chocolate “glue” set firmly.
Step 4: Dip the Cake Pops
In a narrow jar, melt half of the white chocolate wafers mixed with half the vegetable shortening until smooth. Dip each cake pop straight down into the coating, being careful not to wiggle it and loosen the stick. Let the excess drip off by holding the pop still and gently tapping the stick. Stand the pops upright in a holder or foam block and allow them to set for about 15 minutes. Repeat if needed to get a nice, even coating.
Step 5: Decorate Your Halloween Cake Pops Recipe
Warm the remaining coating, mixing in more shortening if needed, then pipe designs onto your cake pops. For mummies, pipe straight lines in a cross-hatch pattern to mimic bandages, then add candy eyeballs with a dab of coating to secure. For ghosts and Jack Skellington faces, add black gel food color to the melted wafers and use a piping bag for eyes and mouths. Finish by tying black and white ribbons around sticks for a charming festive touch!
How to Serve Halloween Cake Pops Recipe

Garnishes
Garnish these cake pops with candy eyeballs for instant spooky vibes. You can also sprinkle edible glitter for a magical shimmer or add small pumpkin-shaped candies to enhance the Halloween spirit.
Side Dishes
Pair these cake pops with a classic pumpkin spice latte, a warm apple cider, or even some crunchy caramel popcorn for a perfectly balanced Halloween treat table.
Creative Ways to Present
Display your cake pops in a themed cake pop stand or stick them into a carved pumpkin filled with rice or beans to hold them upright. Wrap individual pops in clear cellophane tied with orange ribbons for party favors your guests will love.
Make Ahead and Storage
Storing Leftovers
Once assembled, store your Halloween cake pops at room temperature in an airtight container for 3-4 days or refrigerate them for up to a week to keep them fresh and delicious.
Freezing
You can freeze these pops for up to 6-8 weeks. Just place them in a freezer-safe container with layers separated by wax paper to prevent sticking and preserve their shape and flavor.
Reheating
No need to reheat cake pops! Just thaw frozen pops in the refrigerator overnight, and they’ll be ready to enjoy just like fresh ones—no baking required.
FAQs
-
Can I make these cake pops with a cake from scratch instead of a mix?
Absolutely! You can use any cake recipe you love—just make sure it’s fully cooled before crumbling and mixing with frosting to form the cake pop base.
-
What if I don’t have candy eyeballs for decoration?
No worries! You can make eyes using small dots of melted chocolate or colored icing, or use tiny candies like mini M&Ms or black sprinkles for a similar effect.
-
How do I prevent the cake pops from falling off the sticks?
Make sure to dip the stick end into melted chocolate before inserting it into the cake ball and chill the cake pops before dipping them fully; this helps secure the stick firmly.
-
Can I use chocolate chips instead of candy wafers for coating?
You can, but candy wafers melt and harden smoother, making them ideal for dipping and decorating cake pops. Chocolate chips may need added shortening to achieve the right consistency.
Final Thoughts
Making these Halloween Cake Pops Recipe treats is such a joyful and creative experience—you’ll have a blast decorating and sharing them! Whether for a party, classroom treat, or spooky snack, these pops are sure to impress and bring smiles all around. Give this recipe a try and make your Halloween celebrations extra sweet and memorable!
Print
Halloween Cake Pops Recipe
- Prep Time: 50 minutes
- Cook Time: 30 minutes
- Total Time: 1 hour 20 minutes
- Yield: Approximately 20–25 cake pops 1x
- Category: Dessert
- Method: Baking
- Cuisine: American
Description
These Halloween Cake Pops are a festive and fun treat, perfect for parties and celebrations. Made with moist red velvet cake and cream cheese frosting, shaped into spooky ghost and mummy figures, and dipped in smooth white chocolate coating with creative decorations, these cake pops are sure to delight both kids and adults alike.
Ingredients
Cake
- 1 box Red Velvet Cake Mix
- 3 large eggs
- 1/2 cup oil
- 1 1/4 cup water
- 5 tbsp cream cheese frosting
Coating & Decoration
- 20 oz white chocolate candy melting wafers
- 1 1/2 tbsp black gel food color
- 1/3 cup vegetable shortening
- Candy eyeballs for decorating
- 50 inch black/white ribbon for decorating
- Cake pop sticks
Instructions
- Preheat and Bake Cake: Preheat your oven to 350°F. In a large mixing bowl, beat the red velvet cake mix, eggs, oil, and water on medium speed for two minutes until smooth. Pour the batter into a greased 9×13 inch baking dish and bake for 25-30 minutes, or until a toothpick inserted into the center comes out clean.
- Cool and Crumble Cake: Let the cake cool in the dish for 10 minutes, then turn it out onto a cooling rack to cool completely. Once cooled, break the cake into pieces and process in a food processor until it forms fine crumbs.
- Mix with Frosting and Shape: Transfer the cake crumbs to a large bowl and add 5 tablespoons of cream cheese frosting. Mix thoroughly until a dough-like consistency forms. Using your hands, roll 2-inch balls from the mixture. Shape four of the balls into cylindrical ghosts by slightly elongating and fanning out one end to form the ghost shape.
- Attach Sticks: Melt about 15 wafers and dip one end of each cake pop stick about 1 inch into the melted chocolate. While still wet, insert into each cake ball about two-thirds of the way in. Wipe off excess candy from the base and refrigerate the pops for 15 minutes to set the sticks.
- Prepare Coating: In a narrow jar or cup, combine half of the white chocolate wafers and half of the vegetable shortening. Heat in the microwave at 30-second intervals, stirring in between, until smooth and the right consistency to dip the pops.
- Dip the Cake Pops: Dip each cake pop into the coating, pushing down gently once without moving to avoid loosening the stick. Hold upright to allow excess coating to drip off, tapping the stick gently. Place the dipped pops upright in a cake pop stand or foam block. Allow to set for 15 minutes.
- Decorate Mummies: Re-melt the remaining coating (adding a bit of shortening if needed) and fill a piping bag with a #3 tip. Pipe straight lines back and forth over four of the cake pops to create mummy bandages. Flip and repeat on the back carefully. Pipe small dots for eyes and quickly press candy eyeballs onto them. Let set.
- Prepare Black Icing: Melt the remaining candy wafers and shortening together, then mix in the black gel food color. Transfer to a piping bag or squeeze bottle for decorating.
- Decorate Jack Skellington: Cut the ribbon into five 10-inch pieces and tie bows around five round cake pops. Use the black icing to pipe Jack Skellington’s face designs securely on these pops, then set in the holder.
- Decorate Ghosts: Use the black icing to place small dots where candy eyeballs will attach on the ghost pops. Pipe large round mouths. Allow to dry fully in the cake pop holder.
- Display and Serve: Arrange your decorated cake pops in the holder and display them at your Halloween party for a spooky and delicious treat.
Notes
- Storage: Store cake pops in an airtight container at room temperature for 3-4 days or refrigerate for 5-7 days to extend freshness.
- Freezing: Freeze cake pops in a freezer-safe container separated by wax paper layers. Seal tightly and freeze for 6-8 weeks. Thaw before serving.
- Use a narrow jar or cup for dipping to control the amount of coating used and maintain proper consistency.
- Pipe decorations carefully for best results and allow them adequate drying time.


https://t.me/s/Online_1_xbet/973
https://t.me/s/Online_1_xbet/990
https://t.me/s/Online_1_xbet/1621
https://t.me/s/Online_1_xbet/1537
**mindvault**
mindvault is a premium cognitive support formula created for adults 45+. It’s thoughtfully designed to help maintain clear thinking
[https://t.me/s/official_1win_aviator](https://t.me/s/official_1win_aviator)
https://t.me/s/Gaming_1xbet
https://t.me/s/PlayCasino_1win
https://t.me/s/PlayCasino_1xbet
https://t.me/s/PlayCasino_1xbet
https://t.me/s/PlayCasino_1win
https://t.me/s/ofitsialniy_1win/33/Sella
https://t.me/s/iw_1xbet
https://t.me/s/ofitsialniy_1win
https://t.me/s/Official_beefcasino
https://t.me/s/bs_1xbet/4
https://t.me/s/bs_1xbet/14
https://t.me/bs_1xbet/35
https://t.me/bs_1xbet/46
https://t.me/bs_1xbet/43
https://t.me/s/bs_1xbet/9
https://t.me/s/bs_1xbet/47
https://t.me/s/bs_1xbet/26
https://t.me/bs_1xbet/39
https://t.me/bs_1xbet/22
https://t.me/s/bs_1xbet/27
https://t.me/bs_1xbet/7
https://t.me/bs_1xbet/28
https://t.me/bs_1xbet/44
https://t.me/s/bs_1xbet/34
https://t.me/bs_1xbet/5
https://t.me/bs_1xbet/34
https://t.me/bs_1xbet/36
https://t.me/s/bs_1xbet/49
https://t.me/s/bs_1xbet/7
https://t.me/s/bs_1xbet/46
https://t.me/bs_1xbet/31
https://t.me/s/bs_1xbet/46
https://t.me/bs_1xbet/48
https://t.me/bs_1xbet/12
https://t.me/s/bs_1xbet/34
https://t.me/bs_1xbet/21
https://t.me/bs_1xbet/31
https://t.me/bs_1xbet/31
https://t.me/bs_1xbet/8
https://t.me/s/bs_1xbet/3
https://t.me/s/bs_1xbet/32
https://t.me/bs_1xbet/23
https://t.me/bs_1xbet/43
https://t.me/bs_1xbet/2
https://t.me/s/bs_1xbet/22
https://t.me/bs_1xbet/31
https://t.me/bs_1xbet/45
https://t.me/s/bs_1xbet/26
https://t.me/s/bs_1xbet/24
https://t.me/bs_1xbet/23
https://t.me/s/bs_1xbet/41
https://t.me/s/jw_1xbet/98
https://t.me/jw_1xbet/357
https://t.me/jw_1xbet/391
https://t.me/jw_1xbet/284
https://t.me/jw_1xbet/803
https://t.me/s/jw_1xbet/480
https://t.me/bs_1Win/515
https://t.me/s/bs_1Win/684
https://t.me/bs_1Win/818
https://t.me/s/bs_1Win/569
https://t.me/s/bs_1Win/474
https://t.me/bs_1Win/332
https://t.me/bs_1Win/379
https://t.me/s/bs_1Win/1314
https://t.me/s/bs_1Win/1139
https://t.me/s/bs_1Win/989
https://t.me/s/bs_1Win/710
https://t.me/bs_1Win/750
https://t.me/s/bs_1Win/1234
https://t.me/s/Official_mellstroy_casino/43
https://t.me/s/Official_mellstroy_casino/55
https://t.me/Beefcasino_rus/33
https://t.me/Official_mellstroy_casino/21
https://t.me/s/Official_mellstroy_casino/32
https://t.me/s/Official_mellstroy_casino/51
https://t.me/s/Official_mellstroy_casino/22
https://t.me/s/Official_mellstroy_casino/47
https://t.me/s/Official_mellstroy_casino/8
https://t.me/Official_mellstroy_casino/15
https://t.me/Official_mellstroy_casino/34
https://t.me/Official_mellstroy_casino/48
https://t.me/s/Official_mellstroy_casino/9
https://t.me/s/Best_promocode_rus/944
https://t.me/s/Best_promocode_rus/1839
https://t.me/s/Beefcasino_rus/57
https://t.me/ud_Drip/62
https://t.me/s/ud_DragonMoney/45
https://t.me/s/ud_Daddy/45
https://t.me/ud_Booi/57
https://t.me/ud_Fresh/46
https://t.me/s/ud_Jet/62
https://t.me/s/ud_Drip/60
https://t.me/s/ud_1xSlots/52
https://t.me/ud_Sol/51
https://t.me/s/ud_Daddy/54
https://t.me/ud_Pokerdom/51
https://t.me/ud_JoyCasino/63
https://t.me/s/ud_Booi/44
https://t.me/s/ud_Starda/57
https://t.me/s/ud_Sol/45
https://t.me/s/ud_Flagman/59
https://t.me/Beefcasino_rus/59
https://t.me/s/ud_Flagman/47
https://t.me/s/?ud_1Go/60
https://t.me/s/ud_Kometa/52
https://t.me/s/ud_Sol/57
https://t.me/ud_MrBit/45
https://t.me/s/ud_Izzi/59
https://t.me/ud_Lex/62
https://t.me/s/ud_Izzi/62
https://t.me/ud_Pokerdom/45
https://t.me/s/ud_Pokerdom/44
https://t.me/s/ud_PlayFortuna/61
https://t.me/ud_Jet/6
https://t.me/s/ud_Fresh/35
https://t.me/s/Ud_KEnT
https://t.me/s/Ud_pIn_up
https://t.me/s/ud_MarTin
https://t.me/s/UD_BOoI
https://t.me/s/Ud_rIoBet
https://t.me/s/UD_jEt
https://t.me/s/Official_mellstroy_casino
https://t.me/s/official_1win_aviator/38
https://t.me/s/UD_lex
https://t.me/s/uD_leoN
https://t.me/s/ud_voDkA
https://t.me/official_1win_aviator/44
https://t.me/s/UD_drIp
https://t.me/s/Ud_GiZbo
https://t.me/s/ud_1Go
https://t.me/s/Ud_monRo
https://t.me/s/tf_1win
https://t.me/s/Top_bk_ru
https://t.me/s/kfo_1win
https://t.me/s/tf_1win
https://t.me/s/kta_1win
https://t.me/s/ud_gIZbo
https://t.me/s/Ud_gAMa
https://t.me/s/uD_LEgzO
https://t.me/s/ud_DRagoNmonEY
https://t.me/s/ud_1Go
https://t.me/s/UD_gGbET
https://t.me/s/Ud_joYCASino
https://t.me/s/Ud_StarDa
https://t.me/s/uD_1xbeT
https://t.me/s/Ud_LEX
https://t.me/s/ud_FRESh
https://t.me/s/UD_VODKA
https://t.me/s/UD_BOoi
https://t.me/s/ke_Riobet
https://t.me/s/ke_Sol
https://t.me/s/official_1win_aviator/179
https://t.me/s/ke_Fresh
https://t.me/s/ke_JoyCasino
https://t.me/s/ke_CatCasino
https://t.me/s/kef_R7
https://t.me/s/ke_1Win
https://t.me/s/ke_1xbet
https://t.me/s/ke_Stake
https://t.me/s/ke_Kometa
https://t.me/s/ke_Jet
https://t.me/s/ke_Pokerdom
https://t.me/s/ke_MrBit
https://t.me/s/kef_beef
https://t.me/s/ke_Gama
https://t.me/s/ke_mellstroy
https://t.me/s/ke_Volna
https://t.me/s/ke_kent
https://t.me/s/ke_Gizbo
https://t.me/s/ke_Casino_X
https://t.me/s/ke_Monro
https://t.me/s/ke_Martin
https://t.me/s/ke_Vulkan
https://t.me/s/ke_Starda
https://t.me/s/ke_Legzo
https://t.me/s/ke_PlayFortuna
https://t.me/s/ke_Flagman
https://t.me/s/ke_GGBet
https://t.me/s/kef_Rox
https://t.me/s/ke_Drip
https://t.me/s/ke_MostBet
https://t.me/s/ke_1xSlots
https://t.me/s/ke_Izzi
https://t.me/s/official_1win_aviator/167
https://t.me/s/ke_Pinco
https://t.me/s/ke_Booi
https://t.me/s/ke_Leon
https://t.me/s/ke_1Go
https://t.me/s/top_kazino_z
https://t.me/s/topcasino_v_rossii
https://t.me/a_Top_onlinecasino/10
https://t.me/s/a_Top_onlinecasino/4
https://t.me/a_Top_onlinecasino/21
https://t.me/a_Top_onlinecasino/15
https://t.me/s/a_Top_onlinecasino/16
https://t.me/a_Top_onlinecasino/9
https://t.me/a_Top_onlinecasino/12
https://t.me/s/a_Top_onlinecasino/10
https://t.me/a_Top_onlinecasino/5
https://t.me/topcasino_rus/
https://t.me/s/official_Sol_ed
https://t.me/s/official_Volna_es
https://t.me/s/official_GGBet_es
https://t.me/s/official_1xbet_ed
https://t.me/s/official_PinUp_es
https://t.me/s/official_Flagman_edxjqqc
https://t.me/s/official_Flagman_es
https://t.me/s/official_Vulkan_es
https://t.me/s/official_MostBet_es
https://t.me/s/official_Kometa_es
https://t.me/s/official_Drip_ed
https://t.me/s/official_Riobet_es
https://t.me/s/official_CatCasino_ed
https://t.me/s/official_CatCasino_es
https://t.me/s/official_Kometa_ed
https://t.me/s/official_1Go_ed
https://t.me/s/official_Irwin_es
https://t.me/s/official_Kent_es
https://t.me/s/official_Starda_es
https://t.me/s/official_Pinco_es
https://t.me/s/official_Pokerdom_ed
https://t.me/s/official_Vulkan_ed
https://t.me/s/official_Izzi_ed
https://t.me/s/official_Stake_ed
https://t.me/iGaming_live/4572
https://t.me/Booi_egs/6
https://t.me/Riobet_egs/21
https://t.me/s/MostBet_egs/12
https://t.me/R7_egs/11
https://t.me/Rox_egs/9
https://t.me/Jet_egs/19
https://t.me/?@DragonMoney_egs/6
https://t.me/s/Pokerdom_egs/17
https://t.me/s/Volna_egs/4
https://t.me/s/Jet_egs/10
https://t.me/s/Volna_egs/3
https://t.me/Leon_egs/13
https://t.me/Monro_egs/16
https://t.me/Drip_egs/10
https://t.me/Stake_egs/4
https://t.me/Izzi_egs/3
https://t.me/s/Legzo_egs/13
https://t.me/CatCasino_egs/6
https://t.me/s/Daddy_egs/22
https://t.me/s/Volna_egs/14
https://t.me/s/Kent_egs/7
https://t.me/?@DragonMoney_egs/10
https://t.me/s/Vodka_egs/10
https://t.me/Pinco_egs/3
https://t.me/s/iGaming_live/4615
https://t.me/Riobet_egs/22
https://t.me/s/va_1xbet/17
https://t.me/s/va_1xbet/9
https://t.me/va_1xbet/11
https://t.me/s/va_1xbet/19
https://t.me/va_1xbet/4
https://t.me/s/va_1xbet/22
https://t.me/va_1xbet/21
https://t.me/s/va_1xbet/14
https://t.me/s/va_1xbet/4
https://t.me/va_1xbet/13
https://t.me/va_1xbet/16
https://t.me/s/va_1xbet/7
https://t.me/s/va_1xbet/11
https://t.me/va_1xbet/12
https://t.me/s/surgut_narashchivaniye_nogtey/8
https://t.me/surgut_narashchivaniye_nogtey/10
https://t.me/s/surgut_narashchivaniye_nogtey
https://t.me/s/rating_online
https://t.me/s/ah_1xbet/13
https://t.me/s/ah_1xbet/19
https://t.me/s/ah_1xbet/15
https://t.me/s/ah_1xbet/10
https://t.me/ah_1xbet/7
https://t.me/s/ah_1xbet/11
https://t.me/ah_1xbet/6
https://t.me/s/ah_1xbet/17
https://t.me/s/ah_1xbet/16
https://t.me/ah_1xbet/21
https://t.me/ah_1xbet/10
https://t.me/s/ah_1xbet/5
https://t.me/s/Best_rating_casino
https://t.me/reyting_topcazino/19
https://t.me/topcasino_rus/
https://t.me/top_ratingcasino/9
https://t.me/top_ratingcasino/2
https://t.me/a_Topcasino/3
https://t.me/a_Topcasino/10
https://t.me/a_Topcasino/2
https://t.me/top_ratingcasino/7
https://t.me/top_ratingcasino/5
https://t.me/a_Topcasino/7
https://telegra.ph/Top-kazino-11-14-2
https://t.me/kazino_bez_filtrov
https://t.me/s/kazino_bez_filtrov
https://t.me/da_1xbet/11
https://t.me/da_1xbet/10
https://t.me/da_1xbet/4
https://t.me/da_1xbet/7
https://t.me/da_1xbet/15
https://t.me/da_1xbet/9
https://t.me/da_1xbet/14
https://t.me/da_1xbet/12
https://t.me/da_1xbet/5
https://t.me/da_1xbet/13
https://t.me/da_1xbet/2
https://t.me/da_1xbet/6
https://t.me/rq_1xbet/1239
https://t.me/rq_1xbet/773
https://t.me/rq_1xbet/652
https://t.me/s/rq_1xbet/719
https://t.me/s/rq_1xbet/1181
https://t.me/s/rq_1xbet/590
https://t.me/s/rq_1xbet/1395
https://t.me/s/rq_1xbet/1124
https://t.me/s/Official_1xbet1/893
https://t.me/s/Official_1xbet1/231
https://t.me/Official_1xbet1/497
https://t.me/Official_1xbet1/627
https://t.me/Official_1xbet1/177
https://t.me/s/Official_1xbet1/556
https://t.me/Official_1xbet1/1305
https://t.me/Official_1xbet1/925
https://t.me/kazino_s_licenziei/6
https://t.me/kazino_s_licenziei/8
https://t.me/Topcasino_licenziya/34
https://t.me/Topcasino_licenziya/13
https://t.me/Topcasino_licenziya/53
https://t.me/s/Topcasino_licenziya/12
https://t.me/s/Topcasino_licenziya/49
https://t.me/top_online_kazino/7
https://t.me/s/top_online_kazino/4
https://t.me/s/top_online_kazino/4
https://t.me/top_online_kazino/8
https://t.me/s/top_online_kazino/5
https://t.me/s/reyting_kasino
https://t.me/s/top_online_kazino/10
https://t.me/top_online_kazino/10
https://t.me/s/top_online_kazino/9
https://maps.google.pt/url?sa=t&url=https://t.me/Official_1xbet_1xbet/877
http://www.sitedossier.com/site/dim-studio.ruhttps://t.me/Official_1xbet_1xbet/207
http://guygaia.com/__media__/js/netsoltrademark.php?d=https://t.me/s/Official_1xbet_1xbet/74
https://www.avito.ru/surgut/predlozheniya_uslug/apparatnyy_manikyur_i_pedikyur_s_pokrytiem_4030660549?utm_campaign=native&utm_medium=item_page_ios&utm_source=soc_sharing_seller
https://clients1.google.com.pr/url?sa=t&url=https://t.me/Official_1xbet_1xbet/1395
https://clients1.google.es/url?sa=t&url=https://t.me/Official_1xbet_1xbet/1371
http://images.google.co.ma/url?q=https://t.me/Official_1xbet_1xbet/74
https://t.me/s/om_1xbet/11
https://t.me/s/om_1xbet/8
https://t.me/om_1xbet/14
https://t.me/s/om_1xbet/6
https://t.me/om_1xbet/12
https://t.me/top_casino_rating_ru/11
https://t.me/s/om_1xbet/13
https://t.me/om_1xbet/8
https://t.me/s/om_1xbet/12
https://t.me/om_1xbet/9
https://t.me/om_1xbet/10
https://t.me/Beef_Casino_rus/182
В чем вина Фатмагюль 1 сезон смотреть онлайн бесплатно — начни прямо сейчас с 1win и получи доступ к богатому выбору онлайн казино, слотов и ставок на спорт с высокими коэффициентами! Регистрация минимальным депозитом от 100 рублей откроет тебе бонусы за депозит до 5000 рублей, фриспины и кэшбэк 10%, быструю выплату выигрышей и круглосуточную поддержку. Весь контент легко доступен в личном кабинете — играй без ограничений, выигрывай крупные призы и наслаждайся лайв-ставками и быстрым выводом!
1 win комиссия — начинай играть прямо сейчас и получай максимум бонусов! Оформи быструю регистрацию, пополняй депозит от 100 рублей и получай до 5000 фриспинов, ставки на спорт с высокими коэффициентами, лайв-ставки и кэшбэк до 10%. Наслаждайся быстрым выводом выигрышей, доступом к онлайн казино, слотам и реальным победам в личном кабинете 24/7 с минимальным депозитом и выгодной программой бонусов!
Выводите выигрыш быстро — 1win время вывода на карту не заставит ждать! Наслаждайтесь мгновенными выплатами кэшбэка и выигрышей до 1 млн рублей, участвуйте в лайв-ставках на спорт и выигрывайте на слотах с бонусами за депозит и фриспинами. Простая регистрация, минимум вложений — максимум возможностей с 1win уже сегодня!
Абуз 1win 2025 — не проскочи! Зарегистрируйся в онлайн-казино и беттинге №1, получи бонусы за депозит до 10 000 рублей, бесплатные фриспины и кэшбэк 15%, делай ставки на спорт с высокими коэффициентами и лайв-ставками, выигрывай реальные деньги, выводи средства за минуты и будь в плюсе благодаря простому личному кабинету и круглосуточной поддержке!
https://t.me/s/Official_Ru_1WIN
https://telegra.ph/Beef-kazino-11-25
Your article helped me a lot, is there any more related content? Thanks! https://www.binance.info/zh-TC/register?ref=DCKLL1YD
https://t.me/s/officials_pokerdom/3444
https://t.me/Martin_officials
https://t.me/s/Beefcasino_officials
https://t.me/s/Martin_casino_officials
https://t.me/s/dragon_money_mani/34
https://t.me/s/iT_EZcAsH
https://t.me/ta_1win/152
https://t.me/s/Russia_Casino_1Win