If you’re on the hunt for a delightfully spooky treat that’s as fun to make as it is to eat, then the Halloween Witch Apples Recipe is your new go-to! This charming and whimsical recipe combines crisp apples, adorable candy eyes, chocolate-covered strawberry hats, and clever little string cheese brooms to create a Halloween snack that’s sure to be a showstopper at any party or family gathering.
Why You Should Make This Recipe
- Super Fun and Creative: Crafting these little witch apples is a delightful activity that invites your inner child out to play and lets you impress your guests with a cute DIY snack.
- Perfect for Halloween Parties: These spooky yet sweet apples are healthy, festive, and sure to please both kids and adults alike.
- Simple Ingredients, Big Impact: Using basic, everyday ingredients, this recipe transforms humble apples and strawberries into a magical Halloween treat.
- Great for All Skill Levels: Whether you’re a kitchen newbie or a seasoned baker, these easy-to-make witch apples will have you feeling like a culinary wizard in no time.
Ingredients & Substitutions
The magic of this Halloween Witch Apples Recipe lies in its simple list of ingredients, each chosen to add the right pop of color, flavor, or texture. Crisp green apples provide the perfect base, while strawberries and dark chocolate create the iconic witch’s hat. The additional candies and icing colors bring everything to life with festive flair.

- Green Apples: Choose firm, shiny apples for a solid base that won’t roll around and hold the decorations well.
- Strawberries: Fresh and juicy, strawberries make for wonderfully shaped witch hats when covered with chocolate.
- Dark Melting Chocolate: This coats the strawberry hats beautifully and gives a glossy finish—feel free to use milk chocolate if you prefer it sweeter.
- Candy Eyes: Essential for bringing your witch apples to life with a touch of spooky personality.
- Sugar Cookies: Acts as the base for the witch hat and adds a nice soft crunch to every bite.
- Colored Icing and Sprinkles: These decorate the hats, making each witch apple uniquely festive and colorful.
- String Cheese, Chocolate Twizzlers, and Pocky Sticks: These clever ingredients transform the apples into full-on witches, complete with playful brooms.
How to Make Halloween Witch Apples Recipe
Step 1: Prepare the Witch Hats
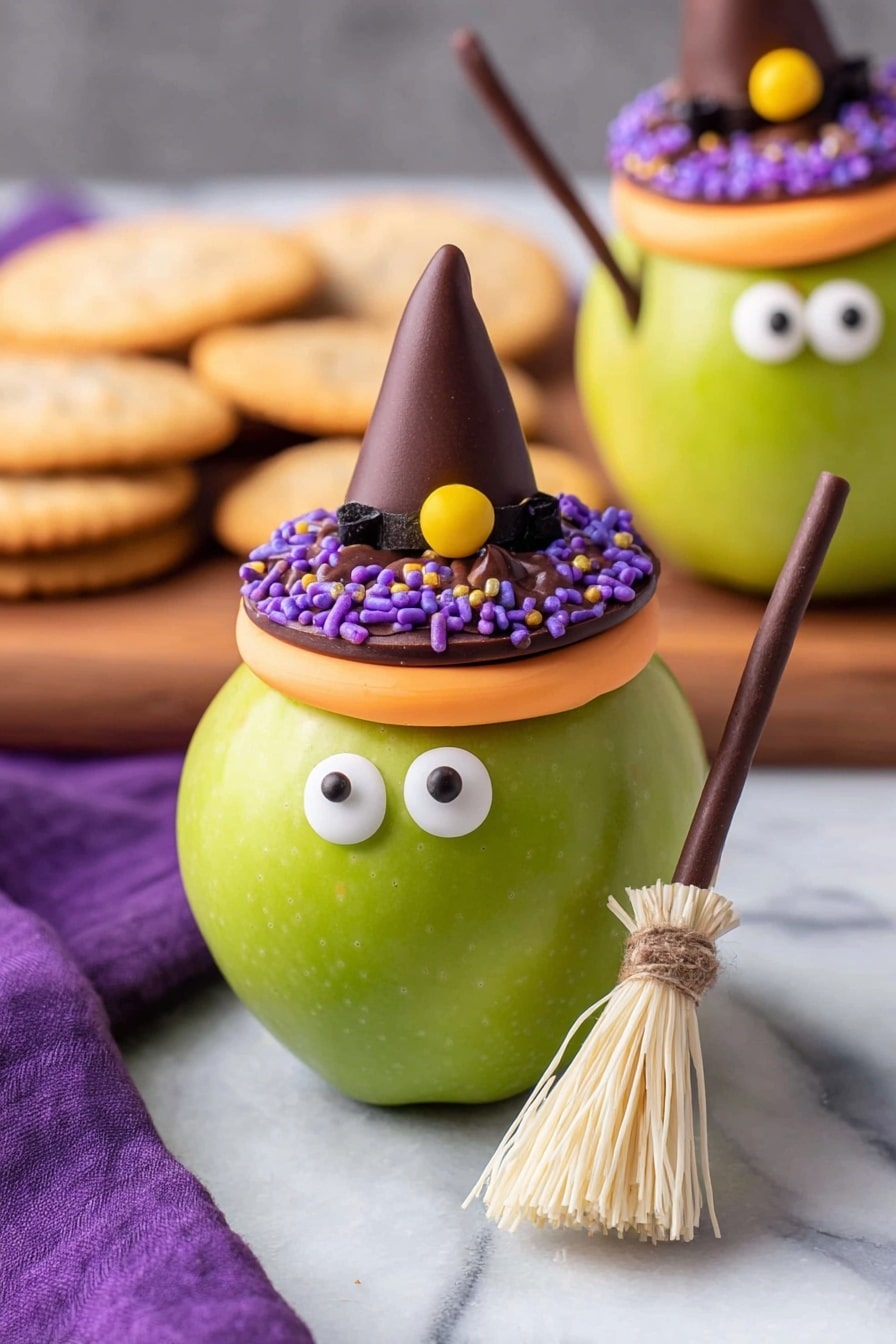
Start by trimming the tops off your strawberries to create a flat surface. Secure the strawberries cut side down onto sugar cookies with a dot of white icing—this forms the base of your witch hats. Next, melt the dark chocolate and spoon it generously over the strawberry hats for that delicious, glossy finish. To set the chocolate quickly, pop them into the refrigerator, giving you perfectly crafted hats in minutes!
Step 2: Prepare the Apples
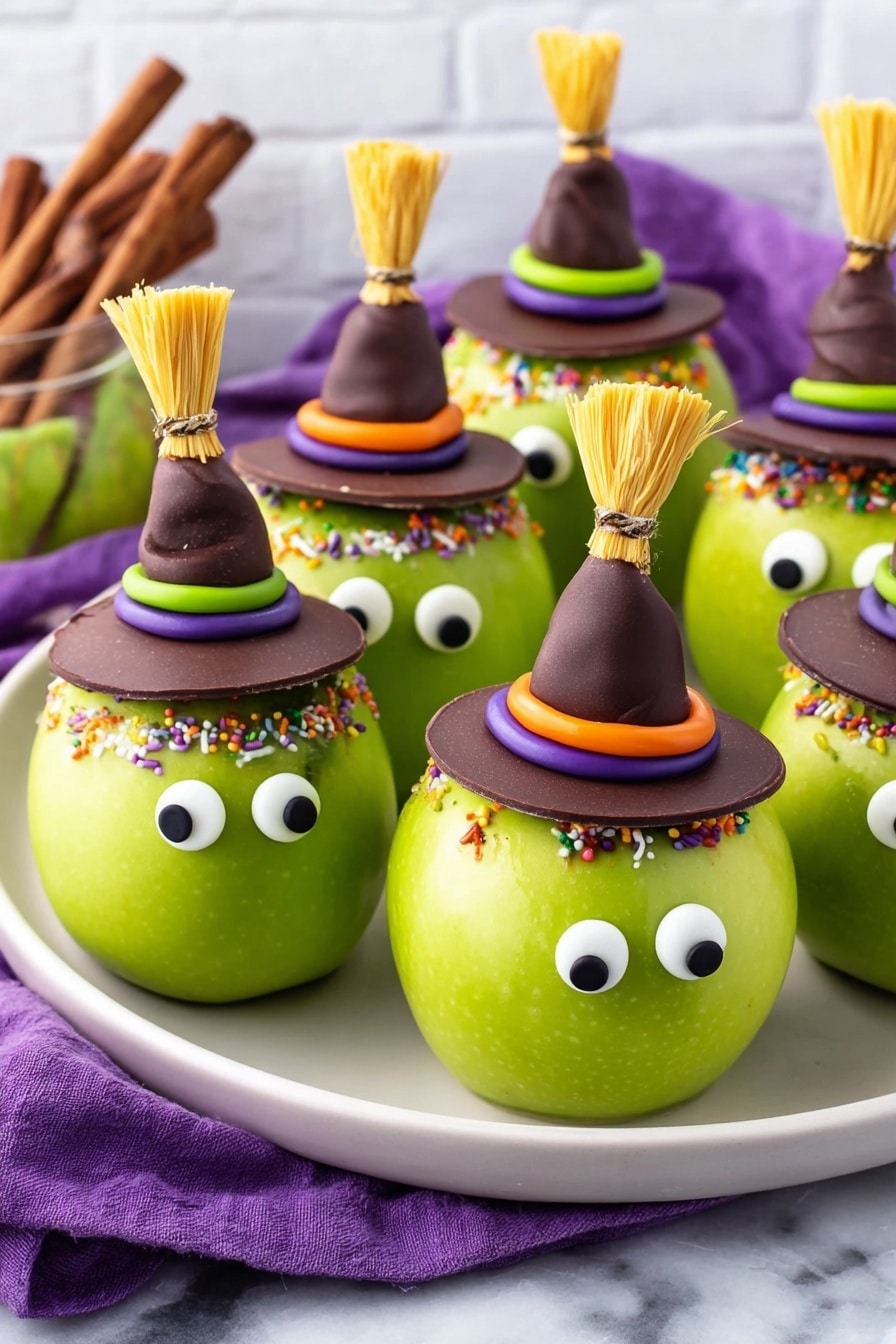
Trim the bottom of each green apple just enough so they sit flat and won’t wobble. Apply small dots of white icing where you want the candy eyes to stick—this is how the witch’s face will come to life! Then carefully press the candy eyes into place and spread a thin layer of white icing on top to secure the chocolate-covered strawberry hats. Don’t go too thick with the icing or the hats may slide around.
Step 3: Decorate the Hats
Add a ring of colored icing around the base where the strawberry meets the cookie. Adorn each with a mini yellow M&M right in the icing and sprinkle on some Halloween-colored sprinkles for that extra dose of fun. Chill the witch apples in the refrigerator for at least 30 minutes to let everything set beautifully before you continue.
Step 4: Create the Brooms
Cut each stick of string cheese in half, then peel or slice about three-quarters up to mimic broom bristles. Insert a chocolate Pocky stick into the uncut end for the handle. Carefully tie half a chocolate Twizzler around the top to secure the broom bristles and trim any excess. These adorable brooms complete the witch look and make your Halloween Witch Apples Recipe irresistibly playful!
How to Serve Halloween Witch Apples Recipe
Garnishes
A little extra festive spirit goes a long way with these witch apples! Consider adding edible glitter or tiny Halloween-themed sprinkles around your serving platter to amplify that magical aura. A sprinkle of crushed candy corn or pumpkin-shaped candies scattered nearby instantly elevates the theme and invites eager hands to dig in.
Side Dishes
Pair your Witch Apples with classic fall treats like caramel popcorn, pumpkin muffins, or even a warm cinnamon-spiced cider. These sides complement the crisp apples and the sweetness of the chocolate hats while keeping your Halloween spread feeling cozy and satisfying.
Creative Ways to Present
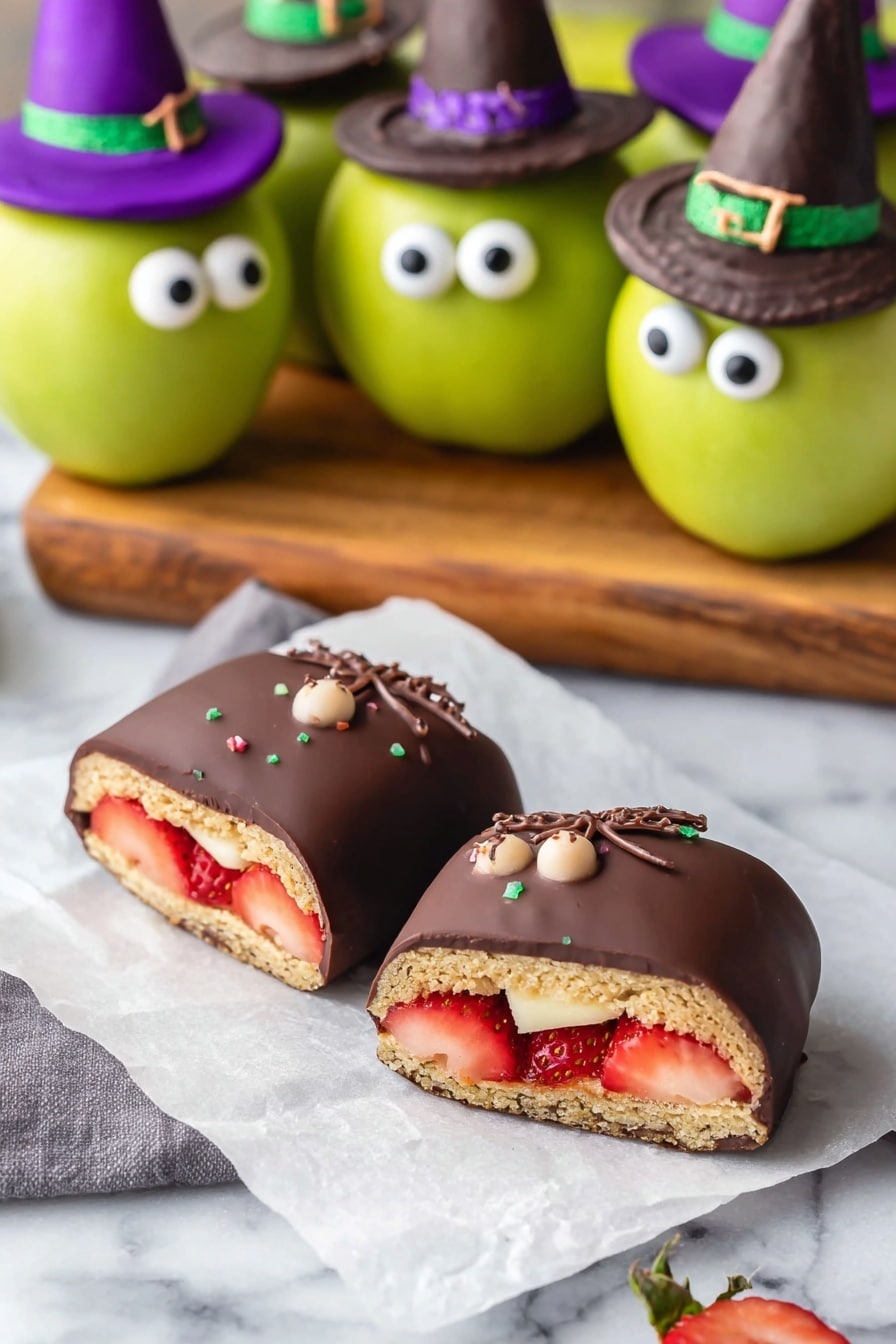
Take your presentation a notch higher by placing each witch apple in individual mini cauldrons or dark-colored gift cups. You can also use black lace doilies or little Halloween-themed plates to set the scene. Consider a rustic wooden board with faux spider webs and mini pumpkins scattered around for a spellbinding centerpiece!
Make Ahead and Storage
Storing Leftovers
These Halloween Witch Apples stay fresh and just as charming when stored in an airtight container in the refrigerator for up to 3 days. Keeping them chilled helps maintain the firmness of the apples and prevents the chocolate from melting or the icing from getting sticky.
Freezing
Freezing isn’t recommended for this recipe because the texture of apples, along with the delicate decorations like candy eyes and icing, can become watery or lose their shape once thawed. For the best experience, enjoy them fresh or within a few days of prepping.
Reheating
Since these witch apples are designed to be enjoyed chilled or at room temperature, reheating isn’t necessary. If you want to soften the string cheese brooms slightly, you can let them sit out at room temperature for about 15 minutes before serving.
FAQs
-
Can I use other types of apples for this recipe?
Absolutely! While green apples like Granny Smith work great due to their tartness and firmness, you can substitute with any firm apple variety you enjoy, such as Honeycrisp or Fuji, depending on your taste preference.
-
How do I prevent the apples from browning after cutting?
To keep your apples looking fresh and vibrant, you can lightly brush them with lemon juice or soak them in a mixture of water and lemon juice before assembling. This prevents oxidation and keeps your Halloween Witch Apples Recipe looking spooktacular for longer.
-
Can I make these ahead of time for a party?
Yes! Prepare them a few hours in advance and chill them well in the refrigerator. Just be mindful not to assemble too far ahead (like the day before) to ensure the apples stay crisp and the decorations stay fresh.
-
What if I don’t have candy eyes?
No worries! You can create eyes using small dots of white icing topped with mini chocolate chips or tiny candies. Alternatively, use edible markers to draw eyes directly on the apple’s surface for a fun twist.
Final Thoughts
I can’t recommend this Halloween Witch Apples Recipe enough for adding a dash of whimsy and a sprinkle of festive fun to your fall celebrations. It’s a perfect blend of tasty, creative, and just a little bit spooky that will have everyone, young and old, smiling ear to ear. So grab those apples and let’s get cracking on some magical munchies!
Print
Halloween Witch Apples Recipe
- Prep Time: 15 minutes
- Cook Time: 10 minutes
- Total Time: 45 minutes
- Yield: 6 witch apples 1x
- Category: Snack
- Method: No-Cook
- Cuisine: American
- Diet: Vegetarian
Description
Celebrate Halloween with these fun and festive Witch Apples! Crisp green apples are topped with adorable witch hats made from strawberries, sugar cookies, and dark chocolate, decorated with colorful icing and candy accents. The perfect spooky treat includes creative string cheese brooms to complete the look, making it a delightful and interactive snack for kids and adults alike.
Ingredients
Witch Hats
- 6 strawberries, washed
- 6 sugar cookies
- 1 cup dark melting chocolate
- 12 large candy eyes
Apples
- 6 green apples, stems removed and washed
Decorations
- 6 mini yellow M&Ms
- Halloween colored sprinkles
- 1/4 cup white icing
- 1/4 cup orange icing
- 1/4 cup purple icing
- 1/4 cup green icing
String Cheese Brooms
- 3 sticks of string cheese
- 6 chocolate Twizzlers
- 6 chocolate Pocky sticks
Instructions
- Prepare Strawberry Witch Hats: Using a small knife, cut the tops off each strawberry to create a flat, even surface. Place a dot of white icing on each sugar cookie and then set the strawberries cut side down onto the icing to form witch hats.
- Melt and Coat Chocolate: In a small bowl, melt the dark chocolate according to package instructions. Use a spoon to cover the strawberry hats with melted chocolate, then transfer them carefully onto a non-stick surface. Allow the chocolate to harden; refrigerate to speed this process.
- Prepare Apples: Cut a small slice from the bottom of each apple to create a flat base, preventing them from rolling.
- Attach Candy Eyes: Using white icing, place small dots on the apples where you want the eyes, then press two large candy eyes onto each apple over the icing dots to secure them.
- Place Witch Hats on Apples: Spread a thin layer of white icing around the top of each apple and gently place one chocolate-covered strawberry witch hat on each. A thin icing layer helps prevent the hats from sliding off.
- Decorate Hats: Pipe a ring of colored icing (orange, purple, green, or white) around where the strawberry meets the cookie on each hat. Place a mini yellow M&M in the icing at the front of the hat and sprinkle with Halloween colored sprinkles. Chill the apple witches in the refrigerator for at least 30 minutes to allow the icing to set.
- Make String Cheese Brooms: Cut each string cheese stick in half. Peel or cut small strands about three-quarters up the stick to resemble broom bristles. Insert a chocolate Pocky stick about half an inch into the uncut end.
- Secure Twizzler Handles: Cut each chocolate Twizzler in half lengthwise carefully. Tie each half around the top of the string cheese broom without pulling too tight to avoid breakage. Trim any excess Twizzler.
- Serve: Arrange the witch apples with the string cheese brooms. Serve chilled or at room temperature and enjoy your spooky, delicious Halloween treat!
Notes
- Storage: Store the witch apple snacks in an airtight container in the refrigerator for up to 3 days to maintain freshness.
- Substitution Tips: You can vary the icing colors to fit your preferences—popular Halloween colors include green, orange, purple, black, brown, yellow, or red.
- Chocolate Twizzlers can be substituted with licorice Twizzlers if preferred.
- Chocolate Pocky sticks can be replaced with chocolate-covered pretzel sticks for a different texture.


https://t.me/s/Online_1_xbet/1301
**mindvault**
mindvault is a premium cognitive support formula created for adults 45+. It’s thoughtfully designed to help maintain clear thinking
https://t.me/s/official_1win_aviator
https://t.me/s/Gaming_1xbet
https://t.me/s/PlayCasino_1xbet
https://t.me/s/PlayCasino_1win
https://t.me/s/PlayCasino_1win
https://t.me/s/PlayCasino_1xbet
https://t.me/s/ofitsialniy_1win/33/Sella
https://t.me/s/iw_1xbet
https://t.me/s/ofitsialniy_1win
https://t.me/s/Official_beefcasino
https://t.me/s/bs_1xbet/27
https://t.me/bs_1xbet/26
https://t.me/bs_1xbet/37
https://t.me/bs_1xbet/10
https://t.me/s/bs_1xbet/48
https://t.me/s/bs_1xbet/37
https://t.me/bs_1xbet/16
https://t.me/s/bs_1xbet/36
https://t.me/bs_1xbet/22
https://t.me/bs_1xbet/34
https://t.me/bs_1xbet/34
https://t.me/bs_1xbet/29
https://t.me/bs_1xbet/10
https://t.me/s/bs_1xbet/26
https://t.me/bs_1xbet/3
https://t.me/bs_1xbet/20
https://t.me/bs_1xbet/20
https://t.me/s/bs_1xbet/49
https://t.me/s/bs_1xbet/15
https://t.me/s/bs_1xbet/33
https://t.me/s/bs_1xbet/5
https://t.me/s/bs_1xbet/21
https://t.me/bs_1xbet/51
https://t.me/s/bs_1xbet/39
https://t.me/bs_1xbet/30
https://t.me/s/bs_1xbet/15
https://t.me/bs_1xbet/21
https://t.me/s/bs_1xbet/18
https://t.me/s/bs_1xbet/24
https://t.me/s/bs_1xbet/41
https://t.me/bs_1xbet/28
https://t.me/s/bs_1xbet/32
https://t.me/s/bs_1xbet/11
https://t.me/bs_1xbet/21
https://t.me/s/bs_1xbet/51
https://t.me/bs_1xbet/29
https://t.me/s/bs_1xbet/40
https://t.me/s/bs_1xbet/26
https://t.me/bs_1xbet/36
https://t.me/s/jw_1xbet/231
https://t.me/jw_1xbet/410
https://t.me/jw_1xbet/894
https://t.me/s/jw_1xbet/750
https://t.me/s/jw_1xbet/190
https://t.me/s/bs_1Win/983
https://t.me/s/bs_1Win/1014
https://t.me/bs_1Win/1247
https://t.me/s/bs_1Win/1229
https://t.me/bs_1Win/515
https://t.me/s/bs_1Win/1140
https://t.me/bs_1Win/1174
https://t.me/s/bs_1Win/1277
https://t.me/s/bs_1Win/376
https://t.me/bs_1Win/885
https://t.me/bs_1Win/1316
https://t.me/bs_1Win/1110
https://t.me/s/Official_mellstroy_casino/18
https://t.me/Official_mellstroy_casino/25
https://t.me/Official_mellstroy_casino/29
https://t.me/s/Beefcasino_rus/15
https://t.me/s/Official_mellstroy_casino/26
https://t.me/Official_mellstroy_casino/45
https://t.me/Official_mellstroy_casino/50
https://t.me/s/Official_mellstroy_casino/31
https://t.me/Official_mellstroy_casino/42
https://t.me/s/Official_mellstroy_casino/36
https://t.me/Official_mellstroy_casino/46
https://t.me/Official_mellstroy_casino/40
https://t.me/s/Best_promocode_rus/1922
https://t.me/s/Best_promocode_rus/1837
https://t.me/s/Beefcasino_rus/57
https://t.me/ud_Martin/64
https://t.me/ud_GGBet/47
https://t.me/s/ud_DragonMoney/64
https://t.me/s/ud_Stake/60
https://t.me/ud_Stake/49
https://t.me/?ud_1Go/61
https://t.me/s/ud_CatCasino/45
https://t.me/ud_Vodka/46
https://t.me/s/?ud_1Go/52
https://t.me/s/ud_1xbet/64
https://t.me/ud_Kometa/61
https://t.me/ud_Izzi/54
https://t.me/s/ud_Pokerdom/55
https://t.me/s/ud_Daddy/45
https://t.me/ud_Jet/57
https://t.me/ud_Legzo/45
https://t.me/ud_Irwin/48
https://t.me/s/Beefcasino_rus/59
https://t.me/s/ud_Lex/52
https://t.me/ud_MrBit/52
https://t.me/ud_Vodka/45
https://t.me/ud_Pokerdom/58
https://t.me/ud_Fresh/63
https://t.me/s/ud_Monro/45
https://t.me/s/ud_Gama/50
https://t.me/ud_Gizbo/56
https://t.me/s/ud_Izzi/62
https://t.me/ud_Leon/3
https://t.me/s/ud_Martin/39
https://t.me/s/uD_MOSTBEt
https://t.me/s/Beefcasino_rus
https://t.me/s/UD_PlAYfoRtuNA
https://t.me/s/ud_1Go
https://t.me/s/UD_jEt
https://t.me/s/uD_ggbET
https://t.me/s/uD_fRESH
https://t.me/s/Ud_FlagMAN
https://t.me/s/official_1win_aviator/55
https://t.me/s/Ud_rIoBet
https://t.me/s/ud_1XsLOtS
https://t.me/s/official_1win_aviator/58
https://t.me/s/Ud_MRbiT
https://t.me/s/UD_ROX
https://t.me/s/Ud_pIn_up
https://t.me/s/uD_daddy
https://t.me/s/ud_poKERdoM
https://t.me/s/tf_1win
https://t.me/s/Top_bk_ru
https://t.me/s/tf_1win
https://t.me/s/kfo_1win
https://t.me/official_1win_aviator/123
https://t.me/s/UD_pIn_uP
https://t.me/s/ud_DRagoNmonEY
https://t.me/s/UD_gGbET
https://t.me/s/UD_sOL
https://t.me/s/uD_StAkE
https://t.me/s/Ud_joYCASino
https://t.me/s/uD_Izzi
https://t.me/s/uD_1xbeT
https://t.me/s/ud_MRbIt
https://t.me/s/UD_VODKA
https://t.me/s/uD_mArTIN
https://t.me/s/ud_keNT
https://t.me/s/ud_PLAYfortunA
https://t.me/s/ke_Monro
https://t.me/s/ke_MostBet
https://t.me/s/ke_Martin
https://t.me/official_1win_aviator/129
https://t.me/s/ke_Kometa
https://t.me/s/ke_Daddy
https://t.me/s/ke_1Go
https://t.me/s/ke_Booi
https://t.me/s/ke_Fresh
https://t.me/s/ke_MrBit
https://t.me/s/ke_Pokerdom
https://t.me/s/ke_Volna
https://t.me/s/ke_GGBet
https://t.me/s/ke_Sol
https://t.me/s/ke_kent
https://t.me/s/ke_Flagman
https://t.me/s/kef_R7
https://t.me/s/ke_Vodka
https://t.me/s/ke_1xSlots
https://t.me/s/ke_Casino_X
https://t.me/s/ke_Pin_Up
https://t.me/s/ke_Drip
https://t.me/s/ke_1xbet
https://t.me/s/ke_Vulkan
https://t.me/s/ke_DragonMoney
https://t.me/s/ke_mellstroy
https://t.me/s/ke_PlayFortuna
https://t.me/s/ke_Pinco
https://t.me/s/official_1win_aviator/417
https://t.me/s/ke_JoyCasino
https://t.me/s/ke_Irwin
https://t.me/s/official_1win_aviator/522
https://t.me/s/ke_Starda
https://t.me/s/kef_beef
https://t.me/s/ke_Gama
https://t.me/s/ke_Izzi
https://t.me/s/ke_1Win
https://t.me/s/ke_CatCasino
https://t.me/s/top_kazino_z
https://t.me/s/topcasino_v_rossii
https://t.me/a_Top_onlinecasino/7
https://t.me/a_Top_onlinecasino/15
https://t.me/a_Top_onlinecasino/8
https://t.me/a_Top_onlinecasino/21
https://t.me/s/a_Top_onlinecasino/2
https://t.me/a_Top_onlinecasino/2
https://t.me/s/a_Top_onlinecasino/11
https://t.me/a_Top_onlinecasino/6
https://t.me/s/a_Top_onlinecasino/5
https://t.me/topcasino_rus/
https://t.me/s/official_Gizbo_es
https://t.me/s/official_MrBit_es
https://t.me/s/official_Stake_es
https://t.me/s/official_PinUp_es
https://t.me/s/official_Daddy_es
https://t.me/s/official_Booi_ed
https://t.me/s/official_Izzi_ed
https://t.me/s/official_MostBet_es
https://t.me/s/official_GGBet_ed
https://t.me/s/official_Drip_es
https://t.me/s/official_Riobet_es
https://t.me/s/official_Volna_ed
https://t.me/s/official_1Go_es
https://t.me/s/official_R7_ed
https://t.me/s/official_Lex_es
https://t.me/s/official_CatCasino_es
https://t.me/s/official_PlayFortuna_ed
https://t.me/s/official_Fresh_ed
https://t.me/s/official_Gizbo_ed
https://t.me/s/official_Jet_ed
https://t.me/s/official_Pokerdom_es
https://t.me/s/official_1xSlots_es
https://t.me/s/official_Izzi_es
https://t.me/s/official_Vodka_ed
https://t.me/s/PinUp_egs/5
https://t.me/s/Legzo_egs/7
https://t.me/s/Legzo_egs/8
https://t.me/iGaming_live/4626
https://t.me/Fresh_egs/17
https://t.me/s/MostBet_egs/18
https://t.me/s/Gama_egs/22
https://t.me/GGBet_egs/7
https://t.me/?@DragonMoney_egs/20
https://t.me/Kent_egs/13
https://t.me/s/Leon_egs/8
https://t.me/s/Izzi_egs/20
https://t.me/Legzo_egs/11
https://t.me/GGBet_egs/12
https://t.me/s/Lex_egs/13
https://t.me/s/PlayFortuna_egs/11
https://t.me/Gizbo_egs/13
https://t.me/s/Riobet_egs/16
https://t.me/Sol_egs/22
https://t.me/Pinco_egs/13
https://t.me/s/Flagman_egs/5
https://t.me/s/Legzo_egs/19
https://t.me/PinUp_egs/12
https://t.me/Drip_egs/14
https://t.me/Flagman_egs/15
https://t.me/s/iGaming_live/4811
https://t.me/s/va_1xbet/16
https://t.me/va_1xbet/12
https://t.me/s/va_1xbet/21
https://t.me/s/va_1xbet/5
https://t.me/va_1xbet/16
https://t.me/s/va_1xbet/15
https://t.me/va_1xbet/7
https://t.me/va_1xbet/6
https://t.me/s/va_1xbet/6
https://t.me/s/va_1xbet/4
https://t.me/va_1xbet/15
https://t.me/surgut_narashchivaniye_nogtey/15
https://t.me/s/surgut_narashchivaniye_nogtey
https://t.me/s/surgut_narashchivaniye_nogtey/18
https://t.me/s/ah_1xbet/6
https://t.me/s/ah_1xbet/22
https://t.me/ah_1xbet/4
https://t.me/s/ah_1xbet/21
https://t.me/ah_1xbet/3
https://t.me/s/ah_1xbet/12
https://t.me/s/ah_1xbet/5
https://t.me/ah_1xbet/14
https://t.me/s/ah_1xbet/13
https://t.me/ah_1xbet/20
https://t.me/s/ah_1xbet/18
https://t.me/ah_1xbet/22
https://t.me/s/ah_1xbet/16
https://t.me/s/Best_rating_casino
https://t.me/s/reyting_topcazino/19
https://t.me/topcasino_rus/
https://t.me/a_Topcasino/8
https://t.me/a_Topcasino/2
https://t.me/a_Topcasino/9
https://t.me/top_ratingcasino/9
https://t.me/a_Topcasino/6
https://t.me/a_Topcasino/10
https://t.me/top_ratingcasino/4
https://t.me/a_Topcasino/4
https://telegra.ph/Top-kazino-11-14-2
https://t.me/s/kazino_bez_filtrov
https://t.me/kazino_bez_filtrov
https://t.me/da_1xbet/9
https://t.me/da_1xbet/13
https://t.me/da_1xbet/2
https://t.me/da_1xbet/4
https://t.me/da_1xbet/3
https://t.me/da_1xbet/10
https://t.me/da_1xbet/7
https://t.me/da_1xbet/5
https://t.me/rq_1xbet/1101
https://t.me/rq_1xbet/562
https://t.me/rq_1xbet/926
https://t.me/s/rq_1xbet/634
https://t.me/s/rq_1xbet/1405
https://t.me/s/reyting_topcazino/24
https://t.me/s/rq_1xbet/1088
https://t.me/s/rq_1xbet/645
https://t.me/s/Official_1xbet1/1329
https://t.me/Official_1xbet1/177
https://t.me/s/Official_1xbet1/598
https://t.me/Official_1xbet1/373
https://t.me/s/Official_1xbet1/194
https://t.me/Official_1xbet1/63
https://t.me/s/Official_1xbet1/774
https://t.me/s/Official_1xbet1/841
https://t.me/Topcasino_licenziya/20
https://t.me/Topcasino_licenziya/42
https://t.me/Topcasino_licenziya/48
https://t.me/s/Topcasino_licenziya/51
https://t.me/kazino_s_licenziei/3
https://t.me/s/Topcasino_licenziya/39
https://t.me/top_online_kazino/5
https://t.me/s/top_online_kazino/5
https://t.me/s/top_online_kazino/10
https://t.me/s/top_online_kazino/6
https://t.me/top_online_kazino/8
https://t.me/top_online_kazino/10
https://t.me/top_online_kazino/7
https://t.me/top_online_kazino/4
http://plotarmour.com/__media__/js/netsoltrademark.php?d=https://t.me/Official_1xbet_1xbet/1806
http://zinkstaal.be/__media__/js/netsoltrademark.php?d=https://t.me/Official_1xbet_1xbet/1557
https://www.avito.ru/surgut/predlozheniya_uslug/apparatnyy_manikyur_i_pedikyur_s_pokrytiem_4030660549?utm_campaign=native&utm_medium=item_page_ios&utm_source=soc_sharing_seller
http://www.google.com.vc/url?q=https://t.me/Official_1xbet_1xbet/655
https://maps.google.com.tw/url?sa=t&url=https://t.me/Official_1xbet_1xbet/955
https://t.me/s/om_1xbet/9
https://t.me/om_1xbet/9
https://t.me/top_casino_rating_ru/11
https://t.me/om_1xbet/5
https://t.me/om_1xbet/10
https://t.me/s/om_1xbet/12
https://t.me/om_1xbet/11
https://t.me/om_1xbet/3
https://t.me/om_1xbet/12
https://t.me/s/om_1xbet/15
https://t.me/top_casino_rating_ru/7
https://t.me/of_1xbet/55
Вин номер киа рио 1 — вступите в игру с 1win и получите максимум выгоды! Наслаждайтесь онлайн-казино, слоты и ставки на спорт с высокими коэффициентами, фриспинами и бонусами за депозит до 5000 рублей, быстрым выводом и кэшбэком 10%. Простая регистрация, минимальный депозит — всего 100 рублей, и круглосуточный доступ к выигрышам, личному кабинету и уникальным промокодам!
Как выводить деньги с 1win на карту? Просто зайдите в личный кабинет и выберите быстрый вывод средств — деньги приходят в течении 15 минут! Наслаждайтесь удобными ставками на спорт и играми в онлайн-казино с бонусами за депозит до 500% и фриспинами, получайте реальный выигрыш и кэшбэк, а также делайте ставки на лайв-события с высоким коэффициентом — всё для вашего комфорта и прибыли!
Вина 1 сезон 5 серия — только в 1win! Откройте личный кабинет, получите бонус за депозит до 5000? и насладитесь выгодными ставками на спорт с высокими коэффициентами, фриспинами в слотах и лайв-ставками 24/7. Быстрый вывод, кэшбэк до 15%, промокод и возможность выиграть реальный деньги прямо сейчас!
https://t.me/s/ef_beef
https://t.me/s/Official_Ru_1WIN
https://telegra.ph/Beef-kazino-11-25
https://t.me/Martin_officials
https://t.me/s/Sol_officials
https://t.me/s/Beefcasino_officials
https://t.me/s/Martin_casino_officials
Thank you for your sharing. I am worried that I lack creative ideas. It is your article that makes me full of hope. Thank you. But, I have a question, can you help me?
https://t.me/s/iT_eZCasH
https://t.me/s/ta_1win/929
В мире азарта, где любой ресурс норовит привлечь заверениями быстрых джекпотов, рейтинг лучших казино игр
становится той самой ориентиром, что проводит сквозь заросли обмана. Тем ветеранов и новичков, кто надоел с фальшивых заверений, это инструмент, чтоб увидеть реальную rtp, словно вес золотой фишки на ладони. Без лишней ерунды, только надёжные клубы, там отдача не просто цифра, а реальная фортуна.Составлено на основе яндексовых запросов, как сеть, которая ловит самые свежие тенденции в сети. В нём минуя роли про шаблонных приёмов, каждый пункт как ставка на столе, там обман выявляется мгновенно. Профи понимают: в стране стиль письма и сарказмом, в котором ирония маскируется под совет, даёт избежать рисков.В http://www.don8play.ru/ такой топ лежит будто раскрытая колода, приготовленный на старту. Зайди, коли желаешь увидеть ритм реальной ставки, минуя иллюзий да неудач. Игрокам тех ценит вес выигрыша, он как иметь ставку в ладонях, вместо пялиться по дисплей.
https://t.me/s/Russia_Casino_1Win
https://t.me/s/official_1win_official_1win